To see how to make the rose, please see my blog post over here on my craft blog, (it seemed a more appropriate place for a how to make pattern).
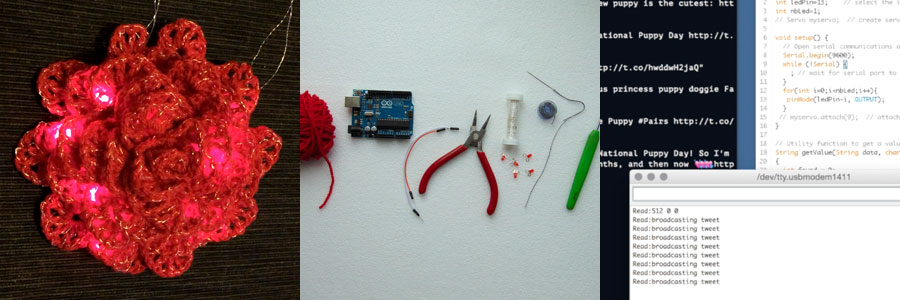
TLDR; I crocheted a rose, a couple of rows of which contained wire, I then sewed LEDs on the rose in a parallel circuit. This post describes how I made it flash when someone tweets with a specified string, head down to the bottom of the post if you don't care about the code, there's a cool video :)
The idea
What I want to happen, now I have a rose which lights up, its to have it flash any time anyone tweets with a string I specify. (The idea came from my workplace, as O2 sponsor the England rugby team, the rose is the English rose and the hash tag to look out for was one O2 was promoting - #WearTheRose).
Along with the rose, I needed an Arduino (I used an Arduino UNO), a script that looked for tweets containing the string I specified and broadcasted them to an Arduino script, which turned the LEDs on when triggered.
The code
It took a lot of searching but most of the code came from one post, which due to the law of sods, I can not for the life of me find :( (I had it open for all the time - as soon as I find it I’ll update).
I had to make a few amendments. The first was adding in the Gemfile. (FYI I’m assuming you have ruby installed and are familiar with gems). For some reason it also wasn’t broadcasting the servo code, so I added line 33.
require 'tweetstream'
require 'serialport'

input=ARGV.shift || "#bordeaux,#strasbourg"
#params for serial port
port_str = "/dev/tty.usbmodem1411"  #may be different for you

sp = SerialPort.new(port_str, 9600, 8, 1, SerialPort::NONE)

TweetStream.configure do |config|
  config.consumer_key       = 'CONSUMERKEYHERE'
  config.consumer_secret    = 'CONSUMERSECRETHERE'
  config.oauth_token        = 'OAUTHTOKENHERE'
  config.oauth_token_secret = 'OAUTHSECRETHERE'
  config.auth_method        = :oauth
end

@client=TweetStream::Client.new;

total=0
last=Time.now
words=input.split(',')
flags=Array.new(words.size)
buffers=words.map{|w| []}
sp.puts "512 0 0" # reset the servo
@client.track(words) do |tweet|
  p "beginning track of #{tweet.text}"
  begin
    search=tweet.text.downcase
    words.each_with_index do |word,i|
      if search.include? word
puts 'got something'
sp.puts "broadcasting tweet"
flags[i]=1
buffers[i]<<tweet
      end
    end
    if (Time.now-last)>0.11
      begin
ratio=(180*buffers[0].size/(buffers[0].size+buffers[1].size)).to_i
str=ratio.to_s+" "+flags.join(' ')
puts str
sp.puts str
last=Time.now
flags=Array.new(words.size,0)
      end
    end
  end
end
There’s a few things you have to set to make sure it runs. One is to create a Twitter app and add your own creds in where it specifies, the other is to make sure the USB port on line 6 is correct. Plug your Arduino in, and in the Arduino IDE go to Tools > Serial Port and type what ever is next to the tick onto line. (E.g. “/dev/tty.usbmodem1411”).
If you navigate to the file in your terminal window and run ruby app.rb “stringtolookforhere” the tweets should start to be echoed out.
Next came the Arduino code, which seemed to work off the bat. I would recommend opening the Serial Monitor (again under Tools in the IDE) as you can visually see the broadcasts and when the lights should be on and off.
int ledPin=13;    // select the input pin for the potentiometer
int nbLed=1;

void setup() {
  // Open serial communications and wait for port to open:
  Serial.begin(9600);
  while (!Serial) {
    ; // wait for serial port to connect. Needed for Leonardo only
  }
  for(int i=0;i<nbLed;i++){
   pinMode(ledPin-i, OUTPUT);
  }
}

// Utility function to get a value from a string at a given pos
String getValue(String data, char separator, int index)
{
  int found = 0;
  int strIndex[] = {0, -1};
  int maxIndex = data.length()-1;

  for(int i=0; i<=maxIndex && found<=index; i++){
    if(data.charAt(i)==separator || i==maxIndex){
found++;
strIndex[0] = strIndex[1]+1;
strIndex[1] = (i == maxIndex) ? i+1 : i;
    }
  }
  return found>index ? data.substring(strIndex[0], strIndex[1]) : "";
}

void loop() {
  if(Serial.available() >0) {
    String str=Serial.readStringUntil('\n');
    Serial.println("Read:"+str);
    for(int i=0;i<nbLed;i++){
      // look for the next valid integer in the incoming serial stream:
      if(!getValue(str,' ',i+1).equals("0")){
digitalWrite(ledPin-i, HIGH);
      }
    }
  }
  delay(100);
  for(int i=0;i<nbLed;i++){
    digitalWrite(ledPin-i, LOW);
  }
}
Hooking it all up
All that’s left to do is upload the Arduino code to your Uno and attach the rose.
Attaching the rose was a very delicate operation, I’d already marked the positive and negative sides of the circuit, it was just a case of winding the wires carefully and making sure they didn’t touch and therefore short.
It did all manage to come together, however, even I was pretty amazed! Here's a video of the whole thing in action:
Looking forward I can not wait to take this idea further. There’s a Red Bear (bluetooth enabled Arduino) just sitting ready to try this with, which would make it much more portable (as long as I can find some power), as well as some much more fancy programmable LEDs.
Watch this space, I think there’s a lot more to come :)